Set up a customer
Before you start
|
Why do I need to set up all this stuff?
|
|
Overview of process |
|
Step 1. Create your customer
- In the Setup/Maintenance menu, select Customer and click 'Add New'.

-
Customer name is the only essential item, but an address might be useful along with notes on the second tab which will appear server-side and device-side respectively (such as 'level 3 engineer required' or 'phone 01234 567890 for access to building'). Sage code is for linking to third party software which is a bespoke option.
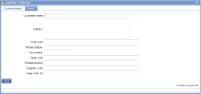
- Save the customer details.
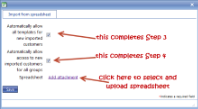
- If you have a large number of customers you may wish to enter the details on a spreadsheet and upload them. magic5 requires a very specific format for the spreadsheet which can be downloaded here. Columns A-G refer to the customer, Columns I-O refer to one or more locations and Columns Q-U refer to the contact for that location. Do not remove the headings (ie Row 1). Once it has been prepared, click the 'Import from spreadsheet' button. You will be asked to add the saved spreadsheet from your files and to chose whether or not to:
- Automatically allow all templates for new imported customers - this will automatically fulfill step 3
- Automatically allow access to new imported customers for all groups - this will automatically fulfill step 4
Step 2 will always be automatically fulfilled, providing that location details have been entered on the spreadsheet.
Please use this facility with care and be aware that existing customers may be overwritten. Also, although individual items can be amended, mistakes often go undetected.
Step 2. Add a location to your customer
-
Click on your customer (after setting up in Step 1 if necessary) to see the attachments list and click the 'Add location' button.

- Location name is the only essential item but the address, notes and site code might be useful. There is also a 'Region or location group' drop-down list that operates in addition to the groups outlined below - see Attachments for a customer and Concepts - Groups for more information.
- Save the customer details.
- Location contacts and location documents can also be added. Be aware that a distinction is made between customer-wide contacts and location contacts.
Step 3. Add a template to your customer
- From the same screen as in Step 2, click the 'Add Template' button and select the required template from the drop-down list.
- You may prefer to 'Add All Templates' to this customer. The main reason for NOT doing this is to offer guidance to device users over which template to use for which customer.
Step 4. Add your customer to a group
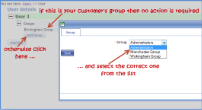
- In the Setup/Maintenance menu, select Groups.

- Click on 'Add Customer' for the group to which this customer is to be added. Initially you will probably only have one called either 'Administrators' or 'Standard'.
- You may prefer to 'Add All Customers' but this enables any customers with user access to view reports to see reports from any customer within that group. It also removes the guidance that you may wish to give to device users about which customers they are dealing with.
Step 5. Ensure that your user is part of the same group
- In the Setup/Maintenance menu, select Users and click on the one that is to be dealing with your customer.
- If your customer's group appears beneath the username then it has already been set up and no further action is required.
- If not, click on the 'Add Group' button and select the group used in Step 4 from the drop-down list.
- Save and your customer is now set up.
Step 6. Receive the updated customer(s) onto your device
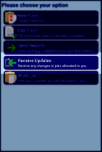
- Open magic5 on your device and the new data should be downloaded automatically.
- If magic5 is already open or the new customer does not appear, select 'Receive updates' from the menu.
- If the new customer still does not appear, check that the above steps have been carried out correctly and, particularly, that the user logged onto the device is part of the same group as the customer.
See Also